Thursday, January 25, 2018

[Tutorial] PS2SDK on Windows10

      How to get the ps2sdk to work on your windows10 system


 What you will need: 


Step 1: (Prepare MinGW)
Install MinGW in C


Extract the mingw-lackages-ps2dev-1.0 and paste them inside MinGW directory C:/MinGW
If it asks to replace any files select NO.


Step 2: (Prepare msys)
Install msys in C
Go to msys/1.0/etc/profile , edit it and add the following:
export PS2DEV=/usr/local/ps2dev
export PATH=$PATH:$PS2DEV/bin
export PATH=$PATH:$PS2DEV/ee/bin
export PATH=$PATH:$PS2DEV/iop/bin
export PATH=$PATH:$PS2DEV/dvp/bin
export PS2SDK=$PS2DEV/ps2sdk
export PATH=$PATH:$PS2SDK/bin
export PS2SDKSRC=$PS2DEV/ps2sdksrc
export PS2LIB=$PS2DEV/ps2lib
export PS2ETH=$PS2DEV/ps2eth
export GSKITSRC=$PS2DEV/gsKit
export C_INCLUDE_PATH=$PS2DEV/ee/ee/include
cd "/C/msys/1.0/"

Then navigate to msys/1.0/bin rename the rxvt.exe to something else (rxvtbak.exe)


Navigate to  msys/1.0/local , extract and copy the ps2dev folder and its contents


Step 3: (Policy Editor)                             

Step 4: (Environment Path)
                           

Step 5: (Install GIT)

Open your msis , and type git to check if it works
if you type now git , svn or wget if the installation was made succesfully will show you as a result the correct syntax to use the command. If not try restarting your system.


Step 6: (Make ELF)
Navigate to the folder where you have your example files (youll need to have a .c file and a makefile) and type make.You should see the same massage and now in the same directory you will have an .elf file.
                             

Thursday, December 7, 2017

Paint.net on Linux Mint

Description: I finally figured out how to properly install Paint.net on my Linux disto {Mint} using POL [PlayOnLinux]
After some trial&error i got the whole thing to work just fine.
What you'll need:
PaintDotNetPortable_3.5.6.0_English.paf
dotNetFx40_Full_x86_x64 or follow the * to install it via POL Components Tested Wine Version: 2.21(Staging)

Here are the steps:


Step 1:
Create your virtual driver & configure it
Install -> Install a nonlisted program -> Install a program in new virtual drive -> Give it a name - > Select Configure Wine -> Select WindowsXP -> Apply & Okay -> 32bits windows installation Select Browse and select the dotNetFx40_Full_x86_x64.exe program.

* or you can close it and install dotNet40 through POL ->Configure -> Install Components ->dotNet40 but before installing it make sure you run this on your terminal first
echo 0 | sudo tee /proc/sys/kernel/yama/ptrace_scope
Step 2:
After that either select the PaintDotNetPortable_3.5.6.0_English.paf.exe file and install it. When it will ask you where to install the programs just navigate through program files and install it where you have all your other vds'.
Step 3:
Select the PaintDotNet so it will create the icon and thats it.
Everytime it opens the tools are a bit bugged so you can press two times the F5 , F6 , F7 , F8 and they will load-up normally.
Step 4:
After that , enjoy.

UPDATE:
To install version 3.5.11 follow the below instructions:

1) Install Wine. (get it from your distro's s/w repository)

sudo nano /etc/apt/sources.list

wget https://dl.winehq.org/wine-builds/Release.key


sudo apt-key add Release.key

sudo apt-add-repository 'deb https://dl.winehq.org/wine-builds/ubuntu/ bionic main

sudo apt-get update

sudo apt-add-repository https://dl.winehq.org/wine-builds/ubuntu/

sudo apt-get update

sudo apt-get install --install-recommends winehq-stable -y

winecfg


2) Install playon linux. (get it from your distro's s/w repository)

3) Run Playon Linux and create a 32-bit XP or Windows10 virtual drive.
4) Use Playon Linux to install “dotnet40” (DotNet 4.0) on that virtual drive.
5) Use Playon Linux to install “gdiplus” on that virtual drive.  
6) Use Playon Linux to install PDN 3.5.11 (It's the latest PDN version I can get running) on that virtual drive.


Saturday, December 2, 2017

Linux Stuttering Driver 380 VRAM BUG / Revert back to 375

Thanks a lot to the r/linux_gaming

So if you are experiencing stuttering in games (opengl/directx[wine]) and noticing a huge FPS drop every 6-7 seconds then this is caused probably because you are using an NVIDIA 38X_x driver which is reported to have a VRAM-BUG issue.

Link about the VRAM-BUG:
https://devtalk.nvidia.com/default/topic/1026874/linux/huge-performance-losses-with-newer-nvidia-drivers/post/5223375/#5223375

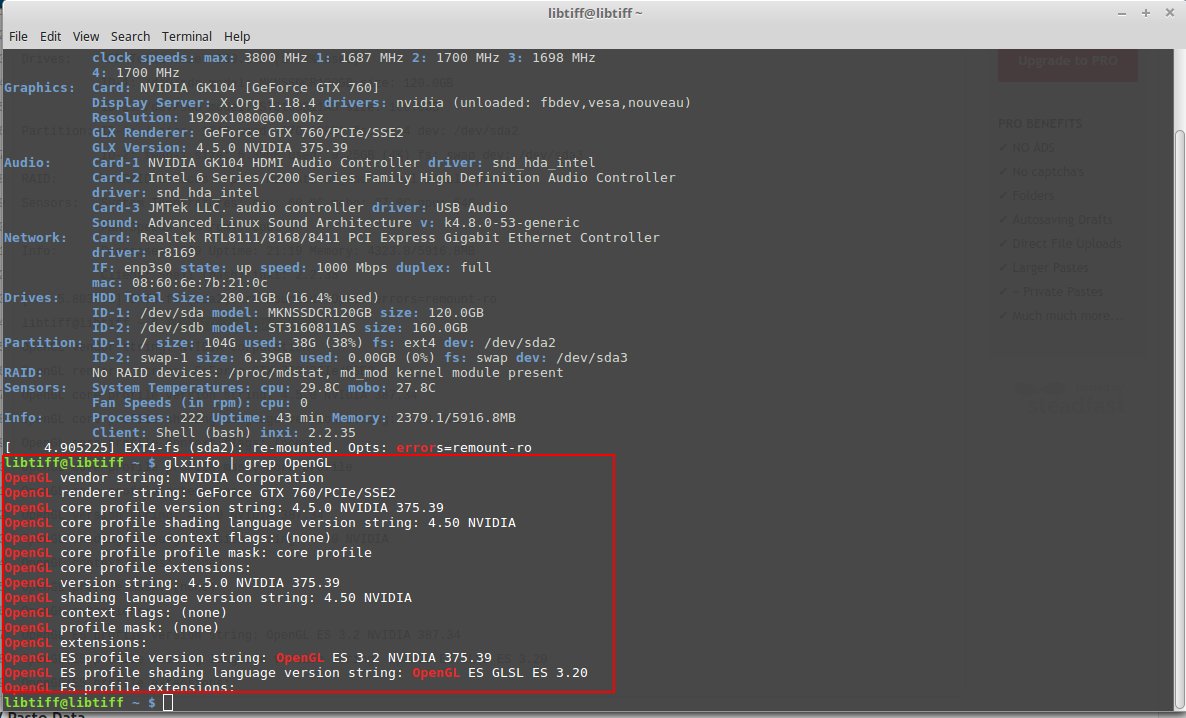
1) First of all open your terminal and check what is your gfx driver version:
inxi -F && dmesg | grep -i error


2) After that run also:
glxinfo | grep OpenGL


3) Open your Driver Manager and select nouveau as default driver:

4) Time to remove all nvidia drivers from our Unix System:

sudo apt-get purge nvidia*

sudo nvidia-settings --uninstall

5) Now lets install nouveau and reinstall some packages
sudo apt-get install --reinstall libgl1-mesa-glx libgl1-mesa-dri xserver-xorg-core xserver-xorg-video-nouveau

6) Make sure that nouveau is not blacklisted:
cd /etc/modprobe.d/
ls

7) Reboot your system

8) Download the 375 driver (nvidia-375_375.39-0ubuntu5_amd64.deb)
http://us.archive.ubuntu.com/ubuntu/ubuntu/ubuntu/pool/restricted/n/nvidia-graphics-drivers-375/

9) Install the new driver , follow the steps for the MOK and SecureBoot(Disabled).

10) Thats it. Restart your system and try out the new driver.
11) Before launching a game check the driver version by running again
inxi -F && dmesg | grep -i error

Thursday, November 23, 2017

CLOUD-IBOX [Custom Mod ~ Goodbye OverHeating]

Well i had some free time in my hands and found an old enigma2 box.
For those who are unfamiliar with these , enigma2 is the Operating System that these boxes run.

Well long-story short , this clone - box suffered from overheating so i thought i would bring it back to life and make it work again.
Why you may ask? Well , why not?! It also supports IPTV so it would be a nice little tv-thingy to have.

Enough with the introduction let me show you the full story with pictures.
I didnt want to plan anything , i love the freestyle trial & error procedure

So the first idea was to install on-top of the stock heatsink another heatsink with a fan.
I cut the plastic in a funny square shape but didnt like it in the end.

So heres the next plan. Remove ALL THE STOCK trash , clean cpu , put new thermal paste , trim the heatsink , adjust it and also keep the card reader/ci somehow.


I installed the cable of the ci reader , melted the plastic to fit the cable through the unused mmc slot. Also ive put 2 tiny heatsinks (Can you spot 'em?)


Put fresh thermal paste and the new heatsink.

Trim a bit the "square hole" on top.

aaand heres the aftermath

These funny airholes were made years ago but what the heck , ill show em to you. They get the job done. Also i swapped the place of the pads , the box now actually sits on the opposite direction as you can.

End Result Fully Working:

Saturday, October 21, 2017

WordPress php File Limit & Exhausted Error

Ever came across the file size limit on php while trying to upload a new wordpress theme?

Well here's how to bypass it by editing your php.ini
memory_limit = 128M upload_max_filesize = 100M post_max_size = 128M file_uploads = On
If you are using cPanel, name the file php.ini
If you're using one of the older Classic Hosting Linux servers, call the file php5.ini
Upload the file to the root directory of your hosting plan. For cPanel, that would be public_html.
For the older servers, it's just the main / folder.

To resolve the exhausted error just navigate to your wp-config.php file and define the new memory limit as shown below(paste it before the "That’s all, stop editing! Happy blogging." line.)
define( 'WP_MEMORY_LIMIT', '256M' );

Thursday, September 14, 2017

Wifi Guide (What is what and how to get maximum compatibility)

Wifi issues are everywhere , the hardest part is when clients don't understand that with great pro's come great con's. Lets list both PROS and CONS or the most common at least.

                                                   Wifi Advantages & Disadvantages      
         ADVANTAGES  
  • Wireless   (No need for cables)
  • Guests need your password to connect to your network.
  • Signal Range in many rooms. (You can be connected to the internet in almost any room of the house. )

    DISADVANTAGES
  • Connection is not stable (Disconnections/Ping(ms))
  • Not so secure (You password can be brute-forced if it is not strong enough)

    Now that we got the first part lets proceed on setting up our router for wifi transmission.

                                       Security Modes and Encryption Algorithms


    BEST COMPATIBILITY              MOST SECURE         LEGACY SUPPORT  
  • WEP 64 (risky): The old WEP protocol standard is vulnerable and you really shouldn’t use it.
  • WEP 128 (risky): This is WEP, but with a larger encryption key size. It isn’t really any less vulnerable than WEP 64.
  • WPA-PSK (TKIP): This uses the original version of the WPA protocol (essentially WPA1). It has been superseded by WPA2 and isn’t secure.
  • WPA-PSK (AES): This uses the original WPA protocol, but replaces TKIP with the more modern AES encryption. It’s offered as a stopgap, but devices that support AES will almost always support WPA2, while devices that require WPA will almost never support AES encryption. So, this option makes little sense.
  • WPA2-PSK (TKIP): This uses the modern WPA2 standard with older TKIP encryption. This isn’t secure, and is only a good idea if you have older devices that can’t connect to a WPA2-PSK (AES) network.
  • WPA2-PSK (AES): This is the most secure option. It uses WPA2, the latest Wi-Fi encryption standard, and the latest AES encryption protocol. You should be using this option. On some devices, you’ll just see the option “WPA2” or “WPA2-PSK.” If you do, it will probably just use AES, as that’s a common-sense choice.
  • WPAWPA2-PSK (TKIP/AES): Some devices offer—and even recommend—this mixed-mode option. This option enables both WPA and WPA2, with both TKIP and AES. This provides maximum compatibility with any ancient devices you might have, but also allows an attacker to breach your network by cracking the more vulnerable WPA and TKIP protocols.

                                                              Wifi Channels

    All wifi network equipment including client devices and broadband routers communicate over specific wireless channels. Similar to channels on a traditional television, each Wi-Fi channel is designated by a number that represents a specific radio communication frequency.

    Wi-Fi devices automatically set and adjust their wireless channel numbers as part of the communication protocol. Operating Systems and utility software on computers and routers keep track of Wi-Fi channel settings being used at any given time.


    Find what channels other modems/routers near you are using by downloading apps like Wifi Analyzer to help you decide what channel has the less interference.


Tuesday, November 15, 2016

I-Phone Backup Password Recover (All the possible default passwords)


If you are reading this you are probably trying to restore to your I-phone device a backup you've made before and it asks you for a password which you dont remember. Crap! Heres a list of the default passwords that are being used (sometimes automatically) if you dont recall of ever setting a password while making your backup. Keep your fingers crossed and lets go buddy.
  1.  Try your iTunes Store password.
  2. Try your 4 digit unlock code for your device. If you have a more complex unlock code involving characters and such, try that too.
  3. Try 0000 as the password, sometimes the default password is in fact, 0000.
  4. Try 1234 as the password, sometimes the default password is in fact, 1234.
  5. Try 123456 as the password, sometimes the default password is in fact, 123456.
  6. If itunes asks for a password which you think you have never set it can be the apple ID password but all in lower case.
  7. Try 123 as the password, sometimes the default password is in fact, 123.
  8. Tr ddd as the password, sometimes the dafualt password is in fact, ddd.
  9.  Go to the Local Users and Groups in Computer Management
    * The local user "Administrator" is normally disabled 
    * Right-Click and choose "Set Password"
    * Choose a password that you'll remember, or your "Go To" password
    * Verify that it's changed - close out of Computer Management
    * Close iTunes, reopen the program - reconnect the phone and use that password.
  10.  Sometimes, the password can be a really old iTunes password that you set a long time ago but have since changed it. The original password is sometimes your backup password. This may be a bug in iTunes but try it and see if it works.
  11. If you are using a Mac, you can try using the Keychain method. First, open Applications > Utilities > Keychain Access.app. Second, in the search dialog, search for "iPhone Backup." Third, double click on the most recent entry for "iPhone Backup." Fourth, at the bottom of the dialogue box, click "Show password" and type in the administrative password for the computer. This will reveal your iTunes backup password!
  12. Try your Windows Administrator password. This is a common solution. Also, even more common is to try the Windows administrator password that you used when you first set up your computer or when you first set up your iPhone.
  13. If you are using Windows, the only thing left to try will be to change your iTunes password on your actual account to access the iTunes Store. Then on the backup password dialogue, try the old password and the newly set password.
  14. If you have ever jailbraked your phone and changed the root password, that password is the correct one!
  15. Your only option now is to download a cracker (Google Iphone Backup Crack) and let it try to decode your password while trying every possible combination.